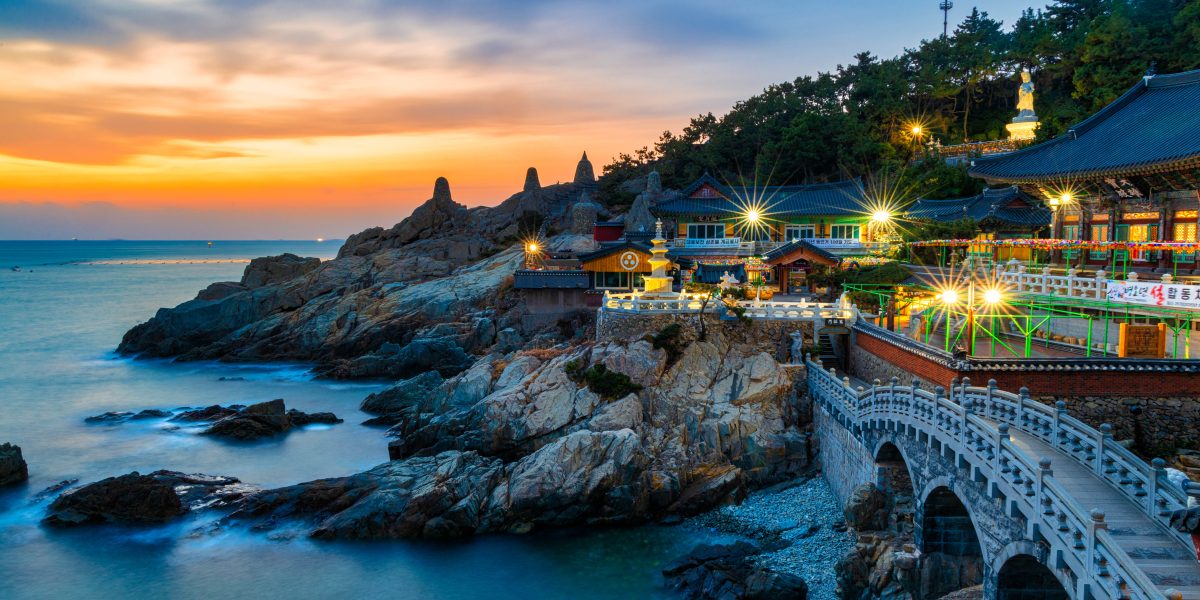
• Aperture 3: Is it worth it?


    When it comes down to it, I am a photoshop lover. I have always been a big fan of the flexibility of the program and the awesome amount of non-photo related stuff that you can do with it. Naturally, when you can’t fork out the bucks you turn to alternatives for your photo adjusting needs. Last year I picked up Mac’s Aperture 2, while I was photoshop deficient and was impressed.

    I am always skeptical of programs like picasa and other photo programs because I think that they just can’t hold a candle to photoshop, but this time around I thought that I would give Mac’s Aperture 3 a test to see it is worth the upgrade. The Apple site boasts some interesting new features that sound well… interesting.

    FACES – Aperture 3 sports a cool facial recognition program that lets you organize your shots into “faces” on a cork board. You can define whose face it is or let it choose the faces and you correct the names. This is great for those people who love taking shots of people, family, and friends. I am not one of those people, so this feature has little to no use for me.

    MAPS – Here is a cool feature that does have some use for me. If you are shooting with a GPS enabled camera… uh really? who has one of those? or if you want to locate your photos on the built in map, here is where you can organize all of your shots. This feature is also integrated into the book feature with a new “essay” style that uses the map as a page style. Yeah that is really neat, so if you plot your shots from Thailand into the map, a map of Thailand will pop in your book. As a geography major, I really like this feature.

    BRUSHES – They have also increased the usability of the brush sets to achieve maximum results. In Aperture 2, I found the brushes a little hard to use, but they now made a huge improvement that I would say even rivals photoshop! (not really, but close) The first thing that made me say “ah cool!” was the brush styles. They have added brushes like “vibrancy” “sharpening” “saturation” etc so that you can add these elements to specific areas. The also plugged a cool feature called “define edges” which means that if you have sharp lines on your photo then brush will stop at the line. This is a great tool for making skies pop and not having everything else pop along with it.

    SLIDESHOWS – I am a big fan of slideshows ever since I started helping with a local scooter club and their yearly inferno. The slideshow was key to peoples enjoyment of the event and the music and video added to the mix. Aperture 3 has an enhanced slideshow feature that lets you build cool looking slideshows, use music from your iTunes library, customize everything and have it play out seamlessly into a quicktime video. The problem with the quicktime is that this is Korea and they love “windows media player” so some of us may have a hard time showing these vids on other computers.

    BOOKS - One of the best features about Aperture is the Book feature. Most people have agreed that the quality of books that Aple creates are second to none and Aperture lets you make them and buy them right from the program! It is insane how easy it is to create a cool looking book. If you are lazy, you and just select you library, choose “auto fill” and bam! the pages are fill with your shots. Then all you have to do is click “buy book” and you’re done. I love this feature because a book with your photos can have so many uses. The fact that you don’t have to even leave the application to get a book set to you is even better!

    FULLSCREEN EDITING - This is a feature that I really like and it was also in the previous version. With the screen quality of my MacBook Pro, I love the fact that I can not only view but fully edit my photos in fullscreen mode. Move your cursor to the top and all of your tools appear. Move it to the bottom and a filmstrip of your photos appears. Hit “H” and your adjustments panel pops up. Tap the left or right arrow keys and it moves to the next photo. I love it!

    FLICKR/FACEBOOK – The new Aperture 3 also has an uploader for these site so that you can upload direct from the program. I haven’t tested this out but I will let you know how it goes. This is a feature that has usability written all over it. With my portfolio down for now, I am uploading to Flickr and Facebook a lot to get my photos out there and my widgets also work with them. Now, Aperture 3 makes it easy to send the images to these sites. They have also put the buttons right at the top of the main toolbar. Before, there were plugins that you could buy that would do the same thing but I felt hard up paying for something so trivial. Now, I don’t have too! 9I bet the guys that made those plugins are a little annoyed at this feature)

    DRAWBACKS – One of the first things that sort of annoyed me about this trial was actually having to rename my licensed copy of Aperture 2 before installing. The second was the fact that I had to create new Aperture 3 libraries. The whole business of importing and exporting photos sort of annoys me. I like having my photos in one place, clicking on the file, editing them, saving them and that is it. Like most apple products Aperture create libraries on your Mac and if you want to edit your photos, you must first import a version into Aperture and then edit it and them export it. I know that it means it is 100% non-destructive but it is also kind of annoying.

    The other thing too is how Aperture resizes the photos. It took me a few weeks with the old version to figure out that you have can crop and do what ever to the photo but it will stay the same size and that you resize it when you export it. This must be defined n the dialogue box before you click “ok”

    Is it Worth It? – If this is your only program to edit photos or if you have an existing copy of Aperture, the totally buy the upgrade. The cost is about $99 and I feel that the improvements made are well worth the money. Simply being able to use the new features and to up load directly to your flickr or facebook accounts are simple amazing. If you are like me and already have photoshop, it is a tough choice. Photoshop is a powerful tool but Aperture 3 makes editing your photos quick and easy.


  • Book Review: A World in HDR by Trey Ratcliff


    I have been looking for a book on HDR written by someone who actually knows how to do it. This isn’t knocking any of the great photographers out there who have given their 2 cents on the technique, but it would be like me commenting on the world of portrait photography. Yes, I have done some, am I good at it? NO. Do I know the finer points and the ins and outs of a studio? Nope, but I know a little… but not enough to tell you how to do it.

    That being said, I am not going to write about how to take portraits. Likewise, I never really got the feeling that the people who were writing about HDR were really into it, until now. This book leaves the others in the dust. Yes, there are now a number of books out that tell you how to make an HDR shot but none tell you the finer points of the programs to make your photos pop like Trey does.

    The book at first glance, looks like a picture book of some of the most eye catching photography that I have seen to date and then you read and Trey tells you how to get these shots. This is a great thing because if you know anything about HDR then you know that there are sometimes limitations to what you can photograph. Moving objects for one is a challenge.

    Remember, that you are taking multiple exposures to create that dynamic range. So if you have a fast moving object, how can you capture 3 photos of exactly the thing? Trey explains all in the book. I would tell you but I actually want you to buy it and use it. Speaking of which, you can pick it up in Korea here at what the book?

    Trey also teaches you a cool double tone mapping technique that gives the photos a more “drawing” like look. Not my most favorite technique but one worth exploring. There is a ton of information here and I hope to show you more photos from the information that I learn from this book. This is a great book and I would really recommend picking it up if you are at all interesting in HDR.


  • 10 Magazine!


    Shaking the dust off

    Originally uploaded by JTeale

    One of the newest and quite possibly the most attractive new foreigner run publications is 10 Magazine. This excellent Magazine features some stunning photography and excellent insight on how to live it up in Korea!

    One of the first things that I noticed when I first picked up this magazine was the quality of the publishing and awesome layout. This is a pro job and it is something that I only wished we could have pulled off when I was doing the “Ulsan Pear” This magazine looks as well as it reads.

    What I like about this mag is the great photography and I hope many of you get a chance to grace its covers because I know that this publication is going to be a hit! The other great thing is the attempt at making this publication “non-Seoul-centric” To me the biggest down of most publications that are for “Foreigners” is the Seoul-centric-ness of the information. However, the hardest part of attempting to expand the borders is finding out useful stuff across this nation. They do a really good job of informing its readers of all noteworthy events in Korea.

    Why would this be important for us? Well, where else are you going to get interesting shots like that one from the Cheongdo Bullfighting Festival? The Calender is a highly organized listing of events across the country and organized by regions. Just flipping through the pages, I have already started planning my next few photo shoots.

    At any rate, next time you can, pick up a copy. They are distributed across the country through Kyobo Bookstores and are cheap! about 3,500 won. Also many restaurants and cafes like Tom N Toms have them for you to read in their stores.

    Their website is always interesting and has tons of information for you to check out. The address is http://10magazine.asia/

    Now I have no affiliation with 10 Magazine, just a subscription. Why I am writing about them today? Well, I got the magazine the other day and was very impressed. If you pick up this month’s issue, check out what the Managing Editor Stephen Revere has to say on page 4.

    I was impressed that this slick mag has a great mind when it comes to helping foreigners. With the more success that they get, the more they will give back to the foreign community and charities that we are involved with. I feel happy that I sent in my $26 a few weeks ago and now can get this every month. Guys and Gals, seriously get out and pick this magazine up and I assure you that you won’t be able to put it down.


  • Food Shots

    When you first come to Korea, the food is among the first things that pops out to most. While we have been accustomed to many different kinds of Asian cuisine, Korean is among the least known to many foreigners that arrive here. Sure, in places like Vancouver and LA there is a Korean BBQ shop just around the corner, but that is only the tip of the iceberg and most of what you’ll eat here would make Indiana Jones squirm a little bit before finding out that it is really good.

    So how do you get good shots of food to show off to your friends and family? Well a lot has to do with preparation, temperature, and depth of field. Simply snapping away as people demolish the food in front of them is not the most appetizing way to show off the delicious food that you are about to eat. So here are a few do’s and don’t about food photography.

    The main thing is that you want the main focus of the shot to be about the food, not the table, not the people behind you, but the food itself. So that meaning fill the frame with the food. Get in nice and tight and really get up close and personal but still leave a bit of room so people can actually see what it is.

    Depth of Field is key to drawing the interest into the frame. I normally shoot most of my shots wide-open at f/1.4 on a 50mm prime lens. This provides an interesting effect, sometimes a bit too much but you want to have it somewhere around there, to add that little bit of artistic bokeh.

    Try not to shoot from eye level. This makes for a less interesting shot of the food. Get down in there and shoot it from table level. This will add further dimensions to your shot. Shooting it from a similar distance from what you would normally eat it from, gives the brain nothing new to look at. This is the same as photographing children, when you get down to their level, the shots are more interesting.

    Be aware of the lighting and the temperature of the colours. Sometimes the lighting used in restaurants is not the most flattering on the food you shoot. I normally shoot in RAW format so that I can adjust these factors using camera raw in photoshop. Another handy tip is to sit next a window during morning or late afternoon. The light from the window should offset the yellowish hue from the lights.

    Table-top tripods work well for shooting on-the-go meaning that if you just sat down, had your camera with you and the food that you ordered looks amazing, these little, but sturdy tripods work great. However, if you get the chance, talk to the manager before hauling out the gear. They may not appreciate such detailed work, or they may give you a treat to take a photo of. Communication is always better than speculation.

    This last one maybe a no-brainer but I still see it a lot. Don’t touch or eat the food before you get a few good shots. You want the photos to make the person viewing them to feel like they, themselves, ordered the food. If you started to demolish the food, then snap a few shots, it looks like someone’s leftovers and not the most appetizing of shots.

    Another thing that is often forgotten is to remove any distractions from around the table. That means get your mitts, hats, receipts, used napkins, etc out of the shot. Again, focus on the food, not what is around it. Unless the surroundings add something to the appetizing look of the food.

    Here is one of the worst shots that I took of food. I had just got my 300D and like most was pretty happy to get some shots of us eating some Whale meat. The shot is as bad as the food itself.

    Here are a few better examples of what I am talking about.

    Notice how your eye is drawn into the guts of the Burger? If you want to show off the food, you want to put the focus on the food.

    Bowls are a bit tricky, but try to get in there...

    Another great example of how to shoot food can be found on Ulsan Online There are a ton of great articles (I know that most of the coffee ones are written by me) but check out Jason Wilson’s recent article and take note of how he shot the chocolate. Amazing photos there. Flash Parker also did a really excellent tutorial on taking shots of food and I think even better than mine. Take a look here

    At any rate, enjoy playing with your food and have a great week!


  • Ji-Bul-Nori 2010


    For those of you who missed it, the Fire Festivals around were lit up last night to bring in the good luck for the year to come. Ulsan’s festival was the biggest that I have ever seen it! Since 2003, this particular festival has been little more than a gathering of people and a bonfire. This year, I guess with the new landscaped area, was an actual “event”

    Great Night for a fire


    This is one of the few festivals that brings Korea back to its roots. Visitors to the festival, held along side the Taehwa River in Ulsan, got to see performances, Korean folk singing and a lot of fire. I was actually surprised at how many people showed up. The event seemed like it went off without a hitch. The vast improvement in Ulsan is amazing to see. Events like these are what make me glad I live here in Korea.

    Sparkler Korea!


    As for myself, I was happy to have got the chance to meet up with the very talented photographer J. Griffin Stewart. I have checked out his site and it is amazing! He has some great work and I hope to be collaborating with him on more events and photographic things in the future. You can check out his site HERE or in the sidebar over there======>

    I think they were trying to write something...


    Griffin also gave me the address of the much hidden “Canon A/S Center” which does that wonderful job of cleaning dirty sensors. Something that I have been needing to do for a long time now and have been just too lazy to do. How do you know if you have a dirty sensor? The easiest way is set your lens to F/22 and take a few shots on a white background. IF you live here in Korea just take a few shots of your apartment’s walls. IF you sensor is dirty, you will see black marks consistently across all the shots. For 10,000 won, the Canon A/S center will clean you camera and your sensor. Thanks Griffin for the information!

    Now, THAT'S a fire!


  • Top Mistakes Photographers Make When They Come To Korea Pt. 2

    Well, Dave Ziser just put out his take on this, so I thought that I would too. Again, these are just tips to improve your photography here, not make you feel like an idiot because you may or may not do them.

    7. No Self-promotion
    I learned this the hard way. I used to leer at another local photographer for always talking about his work and see his photos pop up everywhere. I thought that “my work should speak for itself” Well, it doesn’t and the way to get known is to promote yourself. That guy has over 150 more people on his facebook group than me, if that is any evidence. Don’t know how? Read up on my recent post about business cards. Then use facebook to its full advantage. Get together with other photographers and utilize their networks as well.

    8. Crappy Web-sites
    This is not a dig at anyone and I can’t say that my site is anything special at the moment but this is one of the main things to people view you as a photographer o, so it must work well and look good. Another thing to consider is not posting every photo you take and really cutting down your work. Why? K.I.S.S. Keep It Simple Stupid. If you have a bazillion photos on a site that takes forever to load, people are not going to stay. Put up your best work and keep the party/friend/drunken night in Thailand shots on your facebook account.

    9. Lack of Photoshop Knowledge
    This is a big one and one that irks me to no end. It doesn’t just have to be photoshop, it could be anything (picasa, aperture, lightroom, etc.) but slapping out what photo straight from the camera is a big no no. It is not about “faking” the shot, it is about “working with the image” There are a ton of great resources out there for you to learn photoshop. My favorites are video podcasts like “Photoshop User TV” and “Photoshop Quick Tips” These are both free and great to watch. Also, as I have brought up, Scott Kelby at kelbytrainging.com has a great site and a great series of books designed to help photographers utilize photoshop.

    10. Mixing Work with Pleasure
    I am a teacher according to my visa. So that being said, it is a good idea to maintain the job that pays you regularly, while you are here. Sometimes what you do in your free time could infringe on your contract and get you into a lot of trouble. I did a gallery exhibition last year with the City of Ulsan and it was a blast. My school came out to check out my photos and I sold a lot of them. Then as a teacher was leaving she coyly said to me “Doesn’t think violate your contract? You can’t make any money outside the school” Thankfully I was donating the profit to charity, but even then I was on shaky grounds.
    Another time I was working for the AFC Champions league and I was traveling twice a month for games across Korea. It was a great experience and I had it a planned out with my Director, at the time. Then, right before the last game of the season, she went back on our agreement because my co-workers were complaining about my absence. I had a choice; stay and get paid and keep my job and apartment or go, lose my job and leave the country. I stayed. Yes, AFC used another agency and have been using them ever since, but I kept my job and my apartment.

    11. Not having the Right Tool for the Job.
    There is a lot to be said for the guys that drop a bazillion dollars (or won) on the fanciest cameras and equipment and then not know how to use them, but the same can be said for the guys that don’t. Often I see a lot of new photographers get the cheapest camera with the cheapest lens and the cheapest bag. I think that photography is one of the hardest things to get into because the investment is so high. Once you get into it and you know your camera, start getting better tools for the job. Get a good tripod, get a shutter release, filters to protect your lenses and external drives. A functional bag is a must! Those little bags that you may get with your purchase don’t help when it rains or if they get bumped. Get a bag big enough to store your gear, sturdy enough to protect it and designed for the elements. Get quality glass for your camera and ones that suit your style of photography. Kit lenses are ok, but there is a reason why they are included in your “kit” they are not high quality. Research and invest in a set of good lenses.

    12. Thinking that everyone is their subject.
    You have to be polite when taking shots of people, or really sneaky. Often times people see candid shots of people in National Geographic and think that the photographer was just walking around taking random pics. People have dignity! If you get a shot of a lady at a market, show her. Better yet, ASK HER FIRST! Many times they will agree but they may not and that is their choice. Having cards or buying something after will help ease the creepiness of having some random stranger take their photo. This goes for many businesses too, not just people. I have often been questioned about what I was doing taking photos inside a cafe or around industrial sites.
    The best story that I have is of a friend of mine that was shooting near Hyundai Car Factory. A security guy drove up and asked what he was doing. My friend showed the shots, the guy went through them and said it was ok. My friend ask why and the security guy told him that there were parts of the factory that cannot be photographed. Simple… ask first, shoot later. They have to protect themselves too.

    13. Using the Camera to Pick-up Women
    Yes, guys do this all the time and it is disgraceful and disgusting. There are a lot of beautiful people in Korea but please refer to #12. Often times, I have heard about guys using this line “hey, can you model for me?” in order to get a date with a girl. This is a disgrace to the profession and to photography. Why? First, question I would say is “what are you going to do with the photos?” Next, do you have a model release for? or any other professional document stating the purpose and usage of the photos? Probably not. If you work with models, most of the time you’ll have a studio and the proper gear. If you don’t, take pictures of your girlfriend or your close friends. Chances are they will give you the feed back you need to practice, don’t be a pervert. If you need a professional model, there are a number of agencies that provide models. Go about it the right way.

    14. Calling yourself a “Street Photographer” when you shoot nothing
    “What are you trying to say with this shot?” is what was once asked of me and I could couldn’t come up with an answer. I find a lot of so-called “street photography” just aimless, random, pointless shots taken while waiting to cross the street. Either you are taking fine art photography, beautiful scenic shots, portraits, sports, whatever… There has to be some sort of meaning to the photo and I find that street photography or rather people that are attempting it, seem to have pointless shots of people checking their teeth in a store front window and attaching some sort of socially aware title to it like “Vanity”… what a bunch of Bull S**T
    You photos should convey something. IF you are on the street, there are a ton of things that you can cover from the busyness to the stacked signs, the mixture of English and Korean, the busy food stalls next to highend cafes, something for god’s sake please! Make a story and find the photos to tell it. Do Not Just randomly shoot crap and try and find some mean after when you want to show people your stuff.
    That is it for me people, I have been trapped inside for too long and I have to get out for a bit. I hope to see some of you out tomorrow for the fire festival.


  • HDR Tutorial

    If you are a fan of “dynamic” Korea and its sparkling-ness then you probably want to make your photos that really pop and this is where HDR comes in. Now I know that there are a lot of arguments surrounding the issue of using HDR and some die-hard photographers out there really hate it, but they also said that when DSLR’s and photoshop first came out. Whatever your position is on it, I don’t really care because for many situations, I find that HDR just looks awesome. Especially in Korea, when there is an acid trip like setting to some downtown areas and a stimulus overload of signs and colours that would get washed out if you are not careful. HDR can help make those colours and details pop.

    The question I get asked most is “wow how did you do it? You must have used photoshop” Well yes and no. If you have no idea what HDR is, it is basically fusing 3 shots of the same scene that are exposed at different settings into 1 “dynamic” shot. This is supposed to be a closer version of what the eye actually sees because it uses a broader spectrum. That being said I am going to give you a quicker overview of my workflow and get you started taking some HDR shots.

    First, is what to shoot. Sounds strange I know, but I find that there are some limitations to HDR, that maybe the pros can handle but I don’t think that a beginner could. So be aware that you are going to be taking 3 shots of EXACTLY the same scene. So crowds, moving cars, traffic, trees blowing in the wind, etc are not your best subjects. This is because of the fact that when you put the pics together, whatever program you use will try and match up all of the features and if it can’t, you get what is called “Ghosting” and that is when you get a partial imprint of something on the final image.

    So the things that are great to shoot are skies! Dynamic skies are awesome in HDR! If you wait until a storm breaks at sunset and you can catch the light piercing through the clouds, shoot it. Buildings, reflections, urban areas, are all great to shoot. You want to look for a scene and enhance the colours and contrast.

    Ok, so now how do you do it? Before you even think about hitting that button, put your camera on a tripod. This is a must, there can be no shaky-shaky when you are getting these shots. Next, set you cameras AEB settings (Auto Exposure Bracketing). For older canons like mine (30D) you can find this setting in the menu screen in the red section. For newer canons, you have to hold the “mode” and “AF drive” buttons to turn of the AEB. Nikons, I am not so sure about, but according to Scott Kelby, you can adjust the AEB by pressing and holding the Function button (fn) and then using the command dial to find the AEB mode. He also recommends using 5 shots for HDR. This can be adjusted for canons by using the custom functions panel. For older models like mine, you have to get the extra two manually. I usually set mine two stops above and under, so basically: -2, 0, +2. For the 5 shot guys got with one -2, -1, 0, +1, +2.

    So now that your camera is on a tripod, you have it set up to shoot bracketed shots, what do you do next? Well, I always shoot my shots in Aperture Priority. I just get better results from shooting in this mode. Next you would want to plug in your shutter release, if you have one. If you don’t try using this technique if you have a canon: Switch the drive to timer. For some reason (which is totally cool) in timer mode it will fire all of your bracketed shots for you. So that means either 3 or 5, it will just keep shooting until it is done without having you touch the camera. If you have the shutter release, I usually switch the mode to high speed burst and fire away.

    Now you have your shots, you are back at home with cup of coffee in hand and and the images in front of you. What to do now? One of the best programs out there for HDR is “Photomatix Pro” There are others, but this is the one that I would highly recommend. So, if you have that, fire it up. Next, hit the “Generate HDR” button and load your images. Photomatix does a pretty good job of knowing what photos should be used, so it will let you know if you got a different image in the mix or not, but it is always good to double check. Once the images are loaded, you get a dialogue box with some options. I usually turn on; “align source images” “Reduce Noise” and (if you think there was some movement) “Attempt to reduce ghosting artifacts” Then hit the “Generate HDR button and wait a bit for the process to finish.

    Now, you have a photo that looks like crap.

    Hit the “Tone Mapping” button and work away. The sliders that I usually use are Strength, Saturation, Tone Settings: White Point and Black Point. Typically you want to jack the strength way up to 100% and keep the saturation around 60 for decent results. Next I usually play around with the white points and black points until I get something that I like. Then I save it. I normally keep all of my tone mapped but unprocessed HDRs in one file. I do this so that I can come back to the original HDR and rework it without having to reprocess the entire image set or look through a bunch of files for that one HDR shot. If processed it, it will be in the HDR file.

    Now, load it into Photoshop and make your adjustments. Usually I would process this the same way that I would normally process an image, but there are some differences. One of the key problems with HDR is that there sometimes can be a lot of noise in your shots. So here is where you can use noise ninja or noiseware and remove that stuff. You can also mask out the areas that you want to remain sharp because sometimes these programs also reduce the sharpness of the shot in order to reduce the noise. For sharpening I find that “smart sharpen” works really well for these images.

    Anything beyond these basic steps are for the advanced photographers. If you are one of those guys, then there is a much better, more clearly explained Tutorial series by the most amazing HDR photographer Trey Ratcliff at Stuck in Customs.com Click the link and it will take you to his great tutorial that makes mine looks like that un-tone-mapped image.

    Another great resource is Scott Kelby’s video tutorial on creating HDR photos. This is the companion guide to his great series called The digital photography book and you can check out the video here Just scroll down to chapter 5.

    That is about it. I hope that this will get you at least start in HDR. Let me know how it goes.


  • New Gear: Tripod!

    For years I have been toting around an aging Manfrotto 190D with a 056 3D head. Now, this setup has taken damage of all sorts and has travelled around the world with me, but I was finding that I needed something more. The 190D was a great tripod but lacks many features that the new series have to offer. The 056 3D head was a compromise when I bought it although it has never really like me down, I have always wanted something easier to work with in the field.

    That being said, I wanted something as heavy duty as the 190D but with a smooth sturdy head that allows for quick set up and release. Here is what I went with: Manfrotto 190 ProB (B for black!), a Manfrotto 488 RC2 ball head, and the current version of their carrying strap. It is a sexy setup! I am not sure what the guys a pix-dix normally do on a Monday but they definitely were huddled around my tripod that night.

    Now, I know what you are thinking… “Jason, you just bought the same Tripod with a different head, why didn’t you just by a new ball-head?” Well here the thing, a lot of the features that annoyed me before with the old 190 have been greatly improved. First, are the “Leg Locks” The old 190 had these butterfly spinny adjustments and I found out when a friend of mine tried to help me collapse the tripod, they also come apart quite easily and you lose the washers. Also, spinning takes time. The new version, the legs drop out with the flick of a switch and lock just as easily.

    The second improvement is the change in the design of the locking buttons to adjust the angle of the legs. The old one would bite and pinch my tender flesh when I would go near them. Now, they are smooth and all you have to do is push the button and adjust.

    Third, is the horizontal centre column. Now with a few adjustments, you have your camera hanging side-ways to get around to more interesting angles. On the old 190, this was impossible. Not to mention the rubber stopper at the bottom of the old 190 was annoying and now has been replaced with a cool mechanical “push-button locking system” So you will never lose that important little black rubber-thing.

    Two new features that they have added are a spirit level and a hook. The spirit level lets you adjust everything to help you make sure that you tripod at least will be level. Then it is up to you to make sure they are lined-up in the camera. The hook I think can have many uses, but the main one, so they said in the manual, is for weight. Yup, hang something heavy off of it to stabilize your tripod during windy days.

    The 488 RC2 Ball Head is great! Compared to my old 056 this is like night and day. Adjusting the 056 took time and patience because of the conical locking knobs. If you are using big lenses then you really had to tighten these knobs hard because they would start to droop under the weight of a full camera set up (big lens, camera, battery pack). Not to mention the fact that simple moves mean three adjustments! Thats: move… crank, crank, crank, move, crank, crank, crank, move, crank, crank, crank! It gets a little annoying when you don’t have much time to set up.

    The 488 RC2 does everything with ease! The panning adjustment lever is there if you need it, but the ball head moves around a full 360 degrees with out needing to use the panning adjustment. The adjustment knob is smooth and powerful. The ball head was not a smooth as I thought that it would be, but maybe it needs to be worked in a little.

    Other than that they made some improvements to their carrying strap. I know that a strap seems minor, until you are humping your gear through the hot streets of Thailand with a strap that seems to be trying to cut you in half. The old strap was very thin and the way I carry my tripod, I had the thinnest part of the strap cutting into my shoulder. Why I carry my tripod with the head down, is I find that the weight distribution is much better and I can also stabilize the heaviest part of the tripod (the head) with my hand while jogging across a street, rather than have it bash into the back of my head.

    The new style has a thick padded neoprene strap that is great! The only issue that I have with it is that they changed where the strap attaches to. The old style attached to the centre column with a sort of slip-knot that kept it out of the way and released easy enough when you wanted to use the centre column. The new system wraps around the legs keeping them altogether when collapsed but then dangles when open, something that I am not sure I really like at this point because it means clipping it back together once you finish and I just found that it can be a little tricky.

    All in all, this is a great set up and I will be testing it all out this coming weekend for the Ji-bul-nori festival. If you are interested in coming along, please leave a comment below and we can all meet up and compare shots later.


  • Top Mistakes Photographers Make When They Arrive in Korea PT. 1

    I got this idea from “Digital Pro Talk” an excellent blog by renowned wedding photographer David Ziser. He gave a list of the top mistakes that new wedding photographers make when they first start out. It got me thinking about photographers in Korea and what mistakes we all make when we arrive here.

    1. Not knowing how their gear works (This was first on David’s list too)
    This one irks me to no end. A lot of people pick up a camera and hope that it will magically make beautiful photos by itself. Well, maybe some do, but mine doesn’t. You have to know your camera inside and out. That means that you have to read the manual a few times, to find out how to adjust all of your settings and what each little knob does. Then maybe do some reading on how to effectively use it.

    2. Disrespect of places of worship
    A lot of the Buddha statues are made of shiny gold and many of them have devout worshipers praying in front of them. This makes every photographer think “National Geographic!” However, this act is just not appreciated and greatly disrespectful. We don’t like it when groups of people follow us around, why would they like it if we are trying to snap a photo while they are praying? Temples are interesting, but shoot with respect.

    3. Lack of Korean
    This one is a challenge for most but a necessary one, learn to speak the language. Even if it is just basic phrases like “May I take your picture?” This just shows that you are trying to learn their culture and communicates that you are a friendly person. It also gives them the opportunity to refuse if they don’t want their picture taken. Not everyone wants to end up on your facebook account.

    4. Being a Douche
    Sometimes a little website or something inflates peoples egos. Sometimes we are really trying hard to get the best shot to send home. Sometimes it may not goes exactly as planned, but that is not a good excuse to use for being a jack-ass. Attitude plays a big part of things here. Sometimes people are going to want to check out what you are doing, sometimes people are going to want to watch you. It is just part of the job, be a nice guy (or gal).

    This also goes for the semi-but-not-quite-pro-wanna-be’s too. I have seen a few people yell at Koreans during high time at Bulguksa for getting in the way of their shot. That just goes with the territory at a popular cultural/tourist site. Just be patient and calm. Nothing is worse that those who are trying to be the “premiere arteest” as Ziser calls them, and just being a douche. Then well all get that label and it makes it harder to get good shots.

    5. Not knowing When or How to Shoot
    I have often said that there is a difference between photographers and people who simply take photos. Photographers are the guys (or gals) who get up at 5 am to catch a sunrise or plan their day around their shooting schedule, so that they are in the right place at the right time. I remember shooting the cherry blossoms at Bulguksa with a few photographers. I also remember getting up at 4 am to get to Gyeongju before the crowds arrived.

    Often times I see two very common mistakes from new photographers. The first is shots taken at high noon, with harsh light and flat colours. Sometimes this is hard to avoid, especially if you are on a tour. Other times it just means getting up earlier or staying out later. The second is shooting in the black of night. Often the best shots of a city come when the sun has just gone down. This means that it is dark but there is still colour in the sky. Scott Kelby at Kelbytraining.com has some great tutorials and an awesome series of books to teaching you everything on how to get the best shots.

    6. Shooting Without a Tripod
    I know that it is a pain in the ass to set up and get ready when you see a great shot and you just want to capture it right away. Just calm down. Most conditions, you may get away without it, but why take that chance? With the wide range of tripods out there, pick up a light one that is easy to carry around with you. Crisp sharp shots are always better than blurry ones.

    If you are worried about “size” I carry around a Manfroto 482 wherever I go. It is about the size of an external hard-drive (in its pouch) and can hold my 30D with a 12-24 wide angle lens and battery pack. It also has a decent ball-head. It can extend up about 30cm and it works great for those restaurant shots where you still can’t believe you meal is still alive.

    7. Paying More Attention to their Camera and Not their Lens
    Some people buy the best camera they can find. They spend thousands of dollars of the latest and greatest DSLR on the market and then stick on the cheapest lens they can buy with little money that they have left over. What a waste. More often than not, a good mid-range camera and good glass (lens) with get you amazing shots. With the market the way it is, the bottom to mid-range DSLRs are 10x what they were, even a few years ago. The constant is the glass attached to them. If you invest in a set of good lenses, then you will see an improvement in the quality of you images.

    Not convinced? Many times I see sporting events where the “team photographer” or the “premier arteest” has a 300mm f/5 lens or something. Not a dedicated sports lens(a fast lens around f/2.8 and a minimum of 200mm). Or I will see someone trying to take portraits with a standard wide angle lens. While you may get some alright shots, you won’t get nearly the quality that you would buying the proper lens for the job.

    I know that having a “big lens” means your friends with their iPhones or point-and-shoots will take their shots at you for “compensating” and what not, but if you are serious about it, once they see your photos they will probably shut up. Also note, that I was once that dude with the 300mm f/5… big mistake.

    I will have more on this topic tomorrow.

    *** I will also be out on the 28th of February shooting the Ji-bul-nori festival along the Taehwa River in Ulsan. If you want to meet up, leave your details in the comment section below or shoot me an email at jt@jasonteale.com


  • Animoto: A cool way to show off your work

    Here is a video that I did for my trip to Thailand. As you can see, it does a pretty good job of displaying the photos. I have shown these on my blog before, but I am testing a new plugin and I want to see how it looks.

    The best part about the Animoto videos is that they have everything that you need, right there. All you have to do is upload the photos, select the music, adjust to your liking by adding text or highlighting certain photos, click finish and you are done!

    Site: www.animoto.com